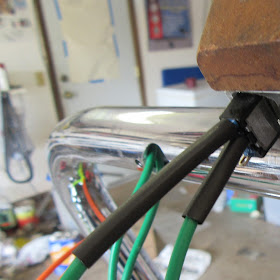
Yes, I am always doing things the hard way and learning what would be easier next time. So I bought 16 gauge wire and should have done 20 gauge. I'm trying to do the solder connections on the bike by myself. I'm doing a mechanical connection and solder connection with one wire that is too big. Next time, do the connections on the bench with smaller wire and better holding tools or some help.
Be sure to put the shrink wrap on the wire before soldering the joint.(That's an old lesson.)

Man this was tough and slow.

Pull the shrink wrap down.

It's always a good idea to do a buzz box continuity check on a switch once you've finished soldering the wires.

Next lesson, don't make straight joints, I really don't like the way those will rub inside the bars. ugh.

Tried to save this switch, but getting the solder flowing and the mechanical joint apart by myself just wasn't happening. Luckily, I picked up spares of all the switches when the local Radio Shack closed up and had everything on clearance.

Fresh switch soldered up.

Shrink wrapped.

Bad picture, but I used liquid tape to cover anything the shrink wrap didn't.

The brake light connections should be easier using the Kawasaki master cylinder and switch.

Simple, like crimp and solder.

Shrink wrap.

More shrink wrap to make it less orange.

Well, this wasn't exactly thought out all the way. So I am using the Kawasaki Vulcan controls. I am a tad concerned that the customization on the clutch lever might fail. I had thought no big deal, just carry a stock style shovelhead lever with the rest of the spares. Well, the Kawasaki clutch perch is a one piece clamp and the flush mount switch boxes don't really lend themselves to quick road side swap. A roadside rig up is still possible though.

Luckily for me, Lummy showed up to help and educate me on doing the left side switches. He said don't worry about threading the wire through the hole on the tabs. Thin the wire as I had done on the right side.

Tin the wires.

So you get something like this.

Tin the terminals.

Something like this.

Now just heat the wire and terminal and everything will stick.

Cut off the extra wire. This is not as mechanically strong, but you shouldn't be yanking on the wires for the most part.

Slide up the shrinkwrap, and paint everything with the liquid tape. (Lummy doesn't slow down for pictures.)

Same process for the horn button.

Left side switches good to go. About a hour for all this work with Lummy compared to like 3 hrs for my solo work on the right side switch.

Continuity checks for all the switches in every position.
Blue loctite on all the little nuts.

Add some extension to the voltmeter wires.

I got the headlight connected to the switch. The new set up means a mess of wire connections around the top tree instead of between the tanks. I'm going to have to clean that up a bit. Then I ran out of spade terminals before I could finish up the wires, so moved on to work on the front brake and fender.

No comments:
Post a Comment