Topical Link Pages

Monday, March 25, 2013

Shovelhead 4 Speed Saga: Going Up Part 10

Time to get to this hole in the frame filled. Columbus came over to help. He didn't sit still for very long at all.


I was trying to remember how to get this back together. The oil filter and buddy pegs make things a trick for sure. First we removed the back plate bolts.
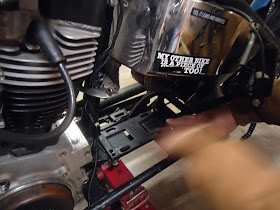

We then swung the plate out to the left.


I held the peg and Columbus dropped the transmission onto the plate.


With the studs in the slots of the plate, we could swing the whole mess back into place.


This is the main part that I was dreading. It was a ton easier with Columbus' help. Thanks again.


Back plate bolts here.


Front plate bolts here.
 

Start into the primary side.


Bearing support plate.


Washers, lockwashers, nuts, and key in place.


Slide the clutch hub on then give it a whack to seat it.


New seal for the hub nut and drive it in.


New tab washer.


Nut goes on. LEFT HANDED THREADS.


Attached holder tool and find the proper socket.


Tighten the nuts on transmission studs to hold it still for torquing the hub nut.


Torque spec.


Then we figured out that my big torque wrench doesn't work going to the left.


We got it plenty tight, but were a bit concerned that the hub was not far enough onto the mainshaft taper.


We used to grease to see how far it fit and if it was square.


Then we looked at the old shaft and it was about the same, so that's fine.


Columbus had to leave and I had other chores to do so we stopped. The main thing was getting the transmission into the frame with some help. I should be able to handle the rest by myself.

Saturday, March 23, 2013

Shovelhead 4 Speed Saga: Going Up Part 9

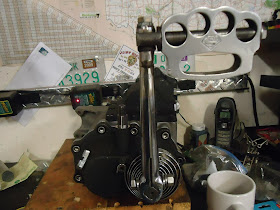
I thought I finally had this deal beat, but Steve73FLH made the call before I verified it with a bench check. The spring is not right and the kicker arm doesn't always return to the top. Luckily I hadn't torqued down the bolts or filled it with oil yet either. I have done this wrong before, too. If the kicker engages while you're riding, bad things happen.


These instructions and every one have read on Shovelhead.us haven't quite made sense to me for sure. Steve helped me understand the method better and hopefully the pictures I have here will help others not do this twice.


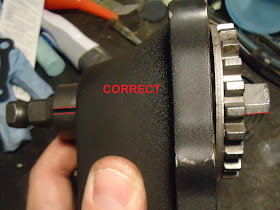
This is where the too loose spring slot in the shaft is with everything installed.


I pulled the cover off and the spring off to inspect the alignment. This is wrong.


I unbent the tab washer, removed the nut, then rotated the crank gear one flat. This got the crank gear stop and the spring slot on the same flat.


This is the spring slot(and gear stop) location prior to install with an unloaded spring.


This is how it looks going on. The install is the same as my other post about it.


This is the new location of the spring slot with everything installed. I did a temp install and the bench checks of the kicker arm were flawless.


I'm going to go over another thing that could be screwed up. The gasket will go on wrong. If it looks like this then flip it over to get it right.


Okay now the back to where we were.


Now we can torque the bolts. Couldn't find a good value so I went with 12 ft-lbs.


Now we are ready for the frame.


Friday, March 22, 2013

Shovelhead 4 Speed Saga: Going Up Part 8

To put a helicoil in the case I need to drill out the hole straight and in the correct spot. I suppose some folks could hand drill it straight enough and hope the bit followed the old hole. I'm too anal, not brave enough, or not good enough to do it that way. I wanted to use my drill press, but it's not an easy shape to hold down, especially when the transmission is already built up. My first plan was to use my support box like this and use nuts on the primary studs to level the transmission.


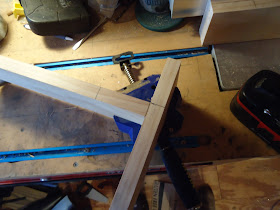
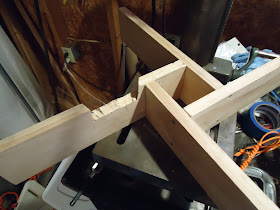
The support box was too small for my little drill press table. So I called Columbus for idea support. He came through with a good one. 1X4 lumber built like this. Mainshaft through the hole and sprocket on the wood.


12 inches long and marked for 2 3/4 inside square.


I even have some cool clamps to use.(I didn't get a picture of the finished jig.)


I had temp installed the cover and gasket, so that's got to come apart.


Lots of blue tape to keep the chips out of the gear box and then find the hole.


Well the jig is not right yet. The rachet top is keeping it unlevel and off the sprocket on one end.


Remove the offending piece.


The jig is still in the way of getting the hole centered under the chuck.


More cutting of the jig and it's perfect.


Clamping everything down was a trick for sure.


I found a transfer punch that fit the hole and then centered the hole to the chuck.


Time to drill. (I'm nervous as a cat at this point.)


Not bad, I wonder if it's perpendicular to the correct datum plane and if its true position is within spec at maximum material condition.


I don't have a dead center so a center should do okay.


Taped and ready for the helicoil.


The bolt holds good.


Break off the tang of the helicoil. (If you have a craftsman screwdriver, then you have a punch, right?)


Good to go.


Back to building. My cover uses bolts not studs but I use 5/16-18 set screws as alignment pins.


Those hold the gasket for me and it won't slip.


Pull out the slinger and catch the crank gear behind it. Turn the the kicker shaft and put the stop where you need it.


Check the video.


Cover is on.


Add the bolts.


Pull the set screws. Add all the bolts and then torque them to spec. This sucker is ready to go back into the frame.