These Trail 70 wheel are another unique piece of motorcycle parts. The split rims and seperate hubs are something I haven't played with before and something you can screw up easy enough. There are no front and rear rims, but there are front and rear hubs and definately a right and left to everything.
The right rim is the place to start. A right rim has the hole for the valve stem and the have a deeper offset.

Lay the right rim down on the bench and put the left half on it.

The front hub sets on the left side with the brake and nut holders out like this. This was just for planning sake because the tube and tire have to go on before the wheel goes together.

Pop the right half into the tire.

Find the hole for the valve stem(tip of middle finger). Put the stem through the hole. Bend stems aren't stock, but cheaper and functional.

Work the tube into the tire.

Flip the wheel to make sure this looks good.

Flip again and align the holes(big with big and little with little) of the left rim with the holes on the right rim and push the left rim into the tire. DO NOT push the left rim into the tire and expect the rim and expect to be able to slide the rim into alignment. Trust me.

Here's the wheel hardware. Four little sets and four bigger sets.

The little ones hold the wheel together. Coming from the right side; bolt, flat washer, lock washer, and nut.

Ensure the you haven't pinched the tube between and snug the hardware

The big sets hold the rims and the hub together. The hub lays on the left side of the rims and the nut goes into the hub. The bolt and lockwasher come in from the right side.

Flip the wheel and tighten the bolts.

I couldn't find a torque spec so I smoked everything down with only a quarter inch ratchet. Hopefully that's tight enough, and I can't break anything with the little ratchet

Now to the rest of the front hub and our old friend the speedo gear.
Amazingly I haven't lost this tiny screw. I need to check the threads for it after the powdercoat though.

Fits fine.

Grease the gear.

Into the housing.

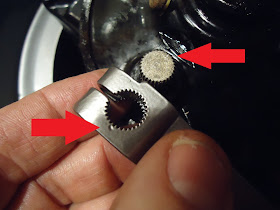
This piece is a tightish fit and you need to align the set screw notch with the hole from the start for sure.

It needs just a little squeeze and it's tough to get a good push on.

Hole and notch aligned.

Set screw in.

Grease everything and put the big gear in.

The powdercoat on the inside made this a bit tight.

The stand offs from the gear fit into these slots in the hub.

Temp install the plate and whack it to fully seat the gear.

Take it back apart and the seal here.

This screw and sealing washer go here. I'm not sure what this does, but I think it's a grease port. Yeah that screw is ugly when everything else looks nice.

Brake cam.

Grease and install it.

Wrestle the new brake shoes on and try not to get grease on them.


Use brake cleaner to clean all the greasy fingerprints you got on the brake shoes.

Well this was an oops. The dot on the cam should line up with the dot on the lever. So the cam is 180 degrees out, but it should work just fine, because I don't want to reinstall the shoes again.

Still lined up, just not together.

Bolt, washer, and funny nut go like this.

Good stopping point. I still need to halfway inflate the tube to get it set. Then full inflate it and whack the tire until the bead is set. And there's a bearing seals the needs to be installed on the right end of the hub. Otherwise the front wheel is good to go.

Great work, man!
ReplyDeleteAmazing! There are different types of CT70 Front Wheel and Tire available in the market. I've always wanted to start a CT70 build (I gotta have one of everything apparently) Since this was going to be a non-stock CT, I started with a bare frame I bought from a fellow in B.C for $10 +$50 for shipping. The frame was in great shape, just a little rust pitting by the lower section near the top engine mount. It had the stock wire harness included but I quickly sold that back on ebay for $10 since I don't trust 33 year old wiring and would be running 12 volts instead of 6.
ReplyDeleteSource : https://techprotools.blogspot.com/