This is where I photo document the projects I'm working on, fixing, or fixin' to fix.
Search
Search all blog posts here.
Search This Blog
Showing posts with label ct70. Show all posts
Thursday, February 14, 2013
CT70 Smoke Chrome and Satin Black Preview
The powdercoat on the Trail 70 parts is done. Here's a sneak peak.. Most of the chrome will be smoke chrome and most of the paint will be satin black.


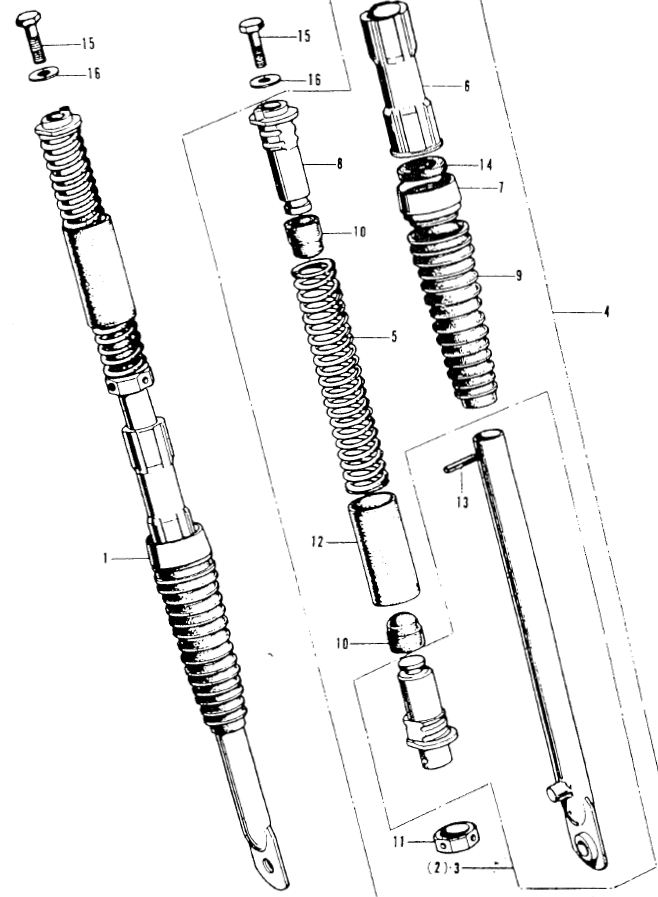
CT70 KO Front Fork Teardown
Getting into these forks.

First note is that one upper keeper(8) has a busted pin. I have a new one to replace it.

Remember the weep hole and the top keeper pin go to the inside.

The Honda book says put the top keeper flats into a vise first, but man is this awkward.

A pin punch and hammer start things. The spring(5) is basically a right handed thread for the keeper.

Once it's started it comes apart real easy.

I guess I should have bought four bumpers(10).

A roll pin(13) holds the piston(11), leg(2), and bottom keeper(3) together.

Roll pin is out and the pistons is totally shelled out. The bottom keeper and spring come apart like the top keeper and spring, but I didn't a picture.


The glide(6) will now slide off.

Then the seal(14), gator(9), and retainer nut(7).

These are going to need to be cleaned up.

After the first teardown, I figured out the best way is to remove the roll pin first.

This makes getting the springs out of the keeper a lot easier.

Everything's apart and on the bench.

After a bath in Columbus' parts cleaner.

These legs are bad, but it's not as critical as true hydraulic fork.


Columbus gets to smoothing out the rough spots on the lathe. These legs are not even truly round more like a seamed pipe.

Now to mask off the working parts. To fix up the showing parts.


A light glass bead blast.

A little clear coat on the showing bit should help.

We tried to clean these, but it looks like they will get powdercoated.

First note is that one upper keeper(8) has a busted pin. I have a new one to replace it.
Remember the weep hole and the top keeper pin go to the inside.
The Honda book says put the top keeper flats into a vise first, but man is this awkward.
A pin punch and hammer start things. The spring(5) is basically a right handed thread for the keeper.
Once it's started it comes apart real easy.
I guess I should have bought four bumpers(10).
A roll pin(13) holds the piston(11), leg(2), and bottom keeper(3) together.
Roll pin is out and the pistons is totally shelled out. The bottom keeper and spring come apart like the top keeper and spring, but I didn't a picture.
The glide(6) will now slide off.
Then the seal(14), gator(9), and retainer nut(7).
These are going to need to be cleaned up.
After the first teardown, I figured out the best way is to remove the roll pin first.
This makes getting the springs out of the keeper a lot easier.
Everything's apart and on the bench.
After a bath in Columbus' parts cleaner.
These legs are bad, but it's not as critical as true hydraulic fork.
Columbus gets to smoothing out the rough spots on the lathe. These legs are not even truly round more like a seamed pipe.
Now to mask off the working parts. To fix up the showing parts.
A light glass bead blast.
A little clear coat on the showing bit should help.
We tried to clean these, but it looks like they will get powdercoated.
Saturday, January 12, 2013
CT70 Levers and Shocks
These came of the red bike, and they are the only ones I have. They are a bit different in length and the front left has been wreck modified and reshaped way too curvy.
Columbus loves his torch.
Pretty much as straight as I want it.It got a little to hot and needs a bit of file work because it kind of melted.
Not perfect, but the plan is to plasti-dip almost the whole lever.
Back to what's left of the red bike. Pull the last shock.
It actually squats and the frame sits pretty decent on the tire.
I need the good handlebar knobs for my build so I'll get those.
I need these reflectors, too.
The shocks need to be torn down. So I got my tool and my helper.
All the bushing and bumper look surprising good.
The right one is bent, but not as bad as the right one off the blue bike.
The left one moves real good, but both on their way to Scooter for rework.
Saturday, January 5, 2013
CT70 Steering stop and neck repair
I'm not a weldor and I need this neck fixed up before powdercoat. So I went to Columbus' place to have him help me. It's pretty awesome to have Columbus help. I just watched and took pictures while he did all the work.
First get rid of the last guy's crappy repair.
Cut the welds.

Knock off the piece.


Clean it up some more.


And some more.

I had planned on using a piece of DOM 1.750 roll bar tubing with a .1875 wall like this one.But Columbus said that was too much work to get to the same end. He had this piece metal laying around with a slight curve to it already.

Just about the right width for the stop, too.

Cut to length, not the safest technique, but you know how Columbus rolls, YOLO.

Heat it up.

Hammer it round.

Looking better.

A little more heat and hammering and we got it nice and tight.

Drag everything into the garage and closer to the MIG welder.

Spot weld in place.

Remove C-clamp and finish weld.

Solid as a rock.

Pretty it up a bit.

Very nice.

A bit too long, so cut that back to just enough.

Of course this bike has been wrecked hard at some point. The part is rolled up and messed up, too.

More MIG.

More clean up. The was some inside clean-up with a dremel tool, but I missed the picture.

Pretty everything up to real nice.

Ready for powdercoat. We left he bearing race in for now for support and mostly through the frame powdercoating. It will get replace with a new bearing when I built it back up.

First get rid of the last guy's crappy repair.
Cut the welds.
Knock off the piece.
Clean it up some more.
And some more.
I had planned on using a piece of DOM 1.750 roll bar tubing with a .1875 wall like this one.But Columbus said that was too much work to get to the same end. He had this piece metal laying around with a slight curve to it already.
Just about the right width for the stop, too.
Cut to length, not the safest technique, but you know how Columbus rolls, YOLO.
Heat it up.
Hammer it round.
Looking better.
A little more heat and hammering and we got it nice and tight.
Drag everything into the garage and closer to the MIG welder.
Spot weld in place.
Remove C-clamp and finish weld.
Solid as a rock.
Pretty it up a bit.
Very nice.
A bit too long, so cut that back to just enough.
Of course this bike has been wrecked hard at some point. The part is rolled up and messed up, too.
More MIG.
More clean up. The was some inside clean-up with a dremel tool, but I missed the picture.
Pretty everything up to real nice.
Ready for powdercoat. We left he bearing race in for now for support and mostly through the frame powdercoating. It will get replace with a new bearing when I built it back up.
Subscribe to:
Posts (Atom)