So the plan was to take spray painted parts of the my primary belt covers and have them powdercoated wrinkle black to match my other engine parts. While I was at it I would add the jockey shift handle and foot clutch pedal from my buddy's Panhead. The ratchet lid would get swapped, too.
Here's the before picture. I painted this stuff black when I first put this bike together and the old chrome and new chrome stuff didn't match. At that time the rocker boxes and right side engine stuff were not wrinkled painted.

All the parts off for powdercoat. I got a swapmeet sparkplug case in there, too.

Back and looking great.


Here's the jockey handle after the lid rebuild and ready to go. I was trying it out and decided it was a bit long and hit the back of my calf when shifting. I decided to bend it out a bit and shorten it a bit for comfort.

I couldn't use my protractor properly, but I locked it in place for a reference only.

I put a little impact tape on it to protect the chrome a bit.

Into the benchvise and pull it until it gives a bit.

Definitely bent out from where we started.

Now too shortened things. I'm thinking I would like a net result something like the top of the black knob, so some of the tap handle may get cut off, too. I also figured out the plasti-chrome end pieces weren't glued on very tight.

I ran a tap as deep as possible into the handle. Surprisingly it's doesn't go all the way through to the fat part. I measure the thread depth with a bolt and marked it.

Compare.

Lay-out dye on the lever.

Mark the diameter down the handle.


Mark the bottom radius where the new threaded portion will end.

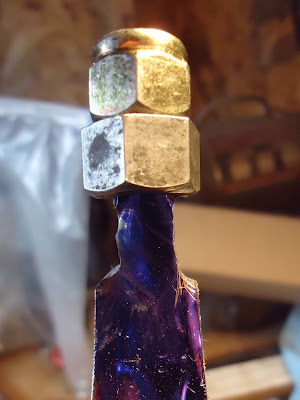
Nuts to protect the already threaded part from the dremel.

Getting there.

A little more work and it's ready to run a die down it.

Not bad. I could have gone farther, but I want to keep a few of the full diameter threads to use though.

Now to shortened the lever.

Looking good. With the length of the new threaded portion of the lever and the depth of the handle threads meant that shortening the handle wouldn't shortened the over all length.

But it is this much shorter than it was.

Much better!


I tried to glue this on with silicon glue, but that didn't work, so it got JB Weld later. That seemed to work, but I didn't get pictures.

On to the foot clutch lever. Seven bolts out and seven bolts in and the control plate and kickstand come off and back on. I have used a pipe through frame before for a quick level stand instead of jack. This will be quick, right?

Four bolts hold the kickstand plate.

A nut for the kickstand. I do this to get spring back on easier later.

Three bolts hold the control plate to the frame.

The little tri-pad on the frame.

New back plate goes on.

Kickstand plate goes on. Wait will the rotor cover fit on now?

Nope. Time to back up.

Rotor cover on, but the pedal plate won't clear the rotor cover front hoop.

Nothing like grinding on a freshly powdercoated part. I'll hit it some black paint and it will be fine.

Grind, check fit, grind, check fit, etc. (This was supposed to be quick job right?)
Now it works.

Let's mock up the rest and it all that works. Nope. The pedal hits the guard. I guess I need to build a new back plate. Some of the other shovelhead.us guys have had to so I shouldn't be shocked, but I was hoping to try it out before I got farther into this deal.

The clutch release arm(PN 37051-36) is all loose and sloppy in the up and down direction too.

Well, it was a freebie from a friend too, but look at this.

Loose one on the left and the cable style I was running on the right for comparison. I'm not sure why it was modified, but I need a new one for sure

Now, I tired and not making progress. So I'll take a quick dinner break. Then come back and take the Kawasaki adapters off my jack and put it under the shovelhead and put the whole mess out of the way until I can figure out my next moves.
This happened while I was in the house eating dinner. The pipe rolled out and bike fell over and now I need to fix this. UGH. The job of getting a kickstand back on should not have taken several hours like it did.

Here's the dumbest part. Read the catalog. My parts from a Panhead need a spacer to fit on a Shovelhead. UGH. UGH. I checked out the plate with spacers I had and yep that would make everything work.

That sucks, crazy how something as small as a spacer can make or break a project.
ReplyDeletePat seems to think the pad on the frame is just a tad back from where it should be, but I mocked it with some spacers and it will work. Sadly I have looked at that catalog page a million times and never noticed that. I keep looking at this picture and thinking it was simple.
ReplyDeletehttp://4.bp.blogspot.com/-rrIKFB6ibow/TfdaVbhPrDI/AAAAAAAABm0/NS5Ia5sff8M/s1600/IMG_2160.JPG