Search

Search all blog posts here.

Search This Blog

Tuesday, January 28, 2014

CT70 Most of the Headlight and Speedo Cable

First thing to figure out is a new to way strap down the bike that will allow access to the headlight ears and horn and front fender area.

Soft hooks high on the bars and real ratchet straps work fine for the job.


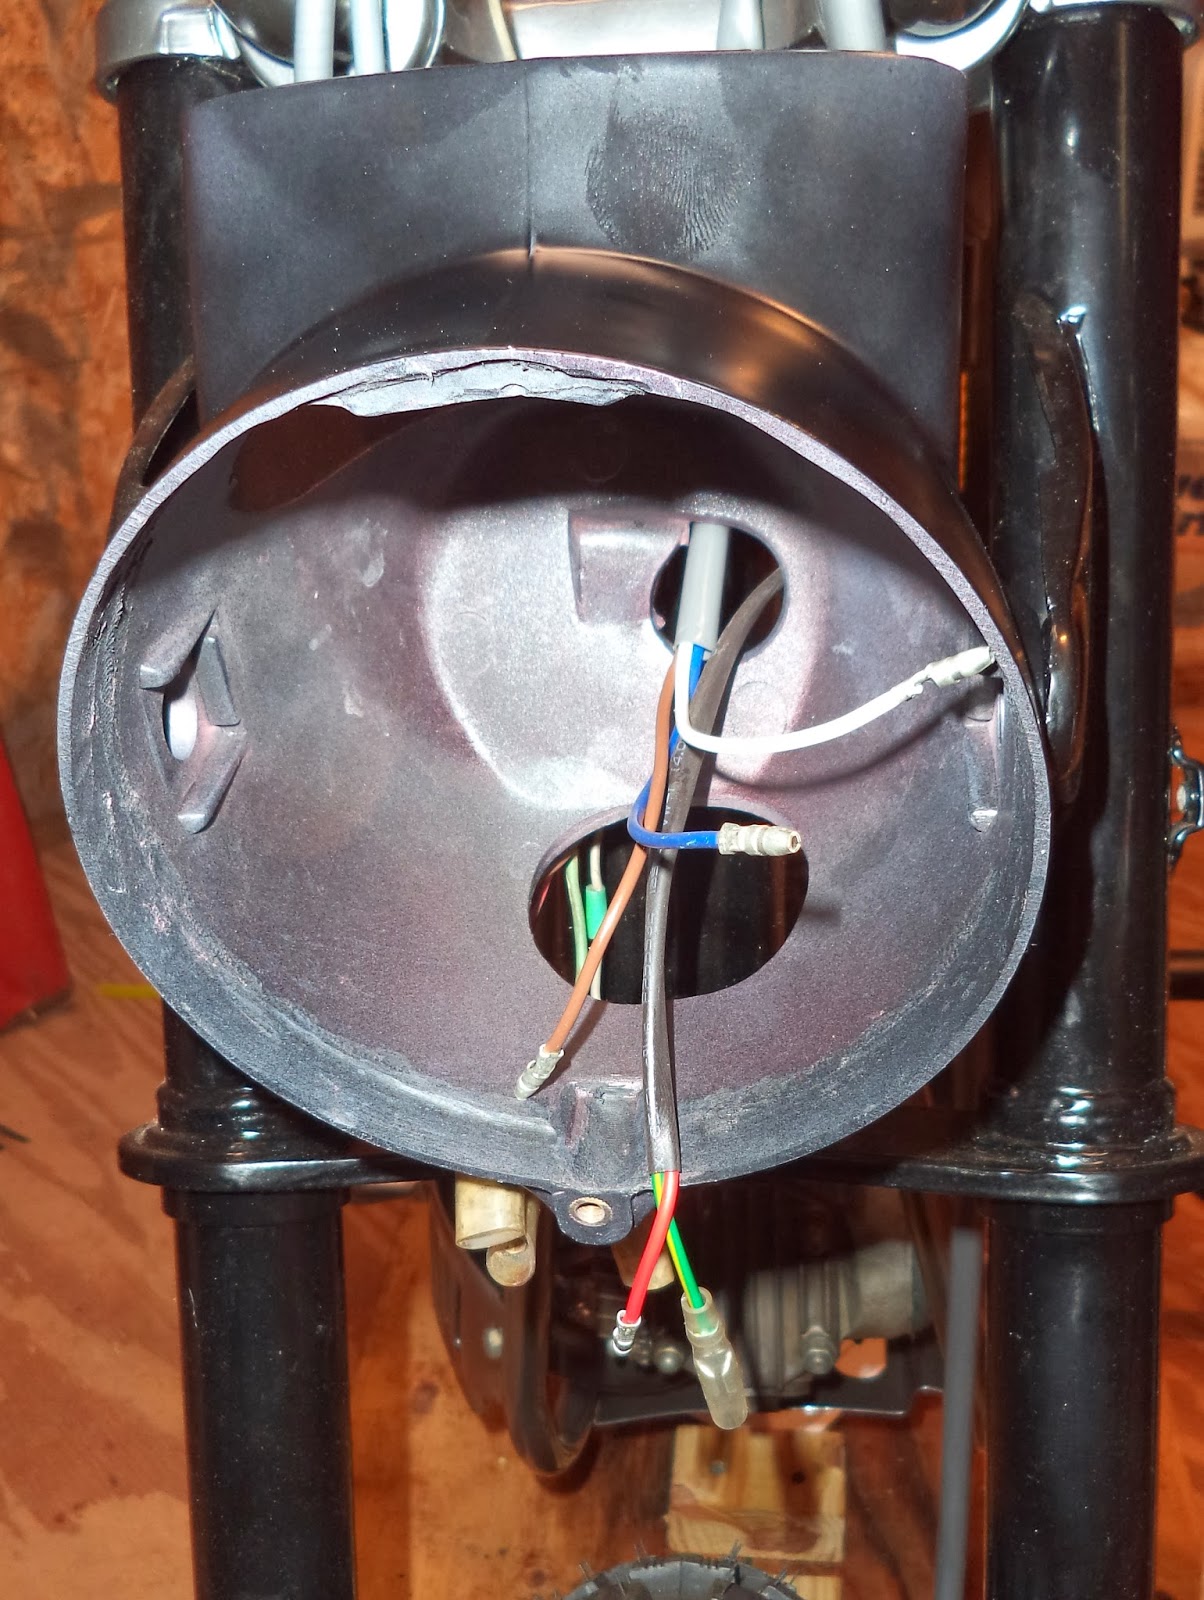
Headlight bucket goes here. It appears that I should not have connected the wires that I did yet.


Bolt, lock washer, washer, (bucket), special square washer and nut.


Wires go through here.


Bolt stack up through the side.


Big boy gets to work on the other side.


Cleaned up the better looking speedo.


Hmmm. I don't like this fit. It's loose. I don't know if the gasket, the clips, or the Chinese bucket is to blame. I'll leave this for now. I want it to look right for the show, but I'm taking off the headlight and taillight when Big Boy starts riding it.


Speedo light connection, brown to brown.


Blue to high beam indicator to junction with Blue on the headlight pigtail and blue from dimmer switch.


White from dimmer switch to white from headlight pigtail. I need to get some electrical tape to cover a few bare spots around this connection.


Greens are grounds that connect to junction on the main harness.


On to the headlight reflector and trim ring. This the side-to-side adjustment screw, spring, and special nut.


Goes together like this.


Top and bottom fasteners. Screw, nut plate, and hairpin clip.


Screw stabs through the trim ring and reflector. Then the nut plate.


Like this, but not too tight.


Hairpin clip keeps the screw from backing out.


I had to crank down the adjustment screw a bunch to get the other holes to line up.


All together. I would install it into the bucket, but I want to fix that white wire first.


Speedo cable starts here.


And it ends here.


For some reason I don't think I routed it correctly though.


Anyone know if that's right? I think it might go in front of the tree instead.


Enough for now.

Monday, January 27, 2014

Harley Davidson Museum - Part 15: The After Party

The trip to the museum was spectacular, especially considering I had only planned it the night before while I was in Chicago to see other friends. As we left the museum, low and behold Kenny the Cable Guy and Katie and Kevin and Jeri were in the parking lot waiting on us. I was so stoked and surprised. Fritz had called them to meet us, but I didn't know about it.

So of course we all headed to a pub downtown.

(L to R) Katie, Kenny, and Traci.


Fritz, Kenny, and Katie.


Jeri and Kevin


The whole crew.


The other thing that made Milwaukee famous. Mr. Schlitz and his Tallboy can.


After all that fun we went back to Fritz's in Chicago and Brett came by later in the evening.


That day was so cool it took 14 posts and over week to blog it all. I can't wait to do it again.

Harley Davidson Museum - Part 14: The Try-on Room

The last room in the museum is a try-on room and of course that's trying to sell you a new bike.

Another photo-op board. (L to R)Traci, random kid to fill hole, Fritz, and me.


Hack rigs are super fast!


Rrrrrmmm... RRrrrmmm!


Beep-beep!


Racing back to the ACE Cafe.


Get low for more speed!


Tri-glide.


Two down low, Bro!


Then we signed the visitors' book.


This was a great day, then it got better.

Harley Davidson Museum - Part 13: Shovelhead Cutaway and Manufacturing

Shovelhead Cutaway. Fritz and I started comparing notes to see if we had enough spare junk parts to build something like this for ourselves. I have melted heads, questionable tappet blocks, fly-wheels with a loose rod, and trashed pistons and cylinders. That almost everything, right?


This was a pretty cool demo of the automated frame welding.


Here's a little display on the airbox forming process.


WOW! Look at this rat's nest that goes into a brand new touring bike.