These are unpaid endorsements for great American made products I use.
Thorlo Socks:
https://www.thorlo.com/
I have been very picky about my socks from a very early age. I love these socks. I wear over calf western dress everyday. https://www.thorlo.com/socks/twd/004. Yes people may baulk at $15 socks, but if you buy a pair you'll know where the money went.
Polar Bottles:
http://www.polarbottle.com/
Lifetime warranty and free replacement caps.
Fisher Space Pens:
http://www.spacepen.com/
I like the triangular shaped pens the best.
http://www.spacepen.com/zerogravitypenrubber.aspx
Round House Overalls:
http://www.round-house.com/
I prefer the dungarees. They are reasonably priced source for raw denim.
http://www.constructiongear.com/workclothing/shopby/brand-round_house.html
http://www.denimexpress.com/round-house-overalls.html
Honorable Mentions: These folk have some American made and imports so be careful.
Redwing Shoes:
http://www.redwingshoes.com/
I wear 2231's. Still made in the USA.
New Balance Shoes:
http://www.newbalance.com/
I wear 990's. Still made in the USA. I wish that they made them in a color besides gray in my size.
Saturday, November 30, 2013
Thursday, November 21, 2013
CT70 KO Forkleg Build
Remember this?

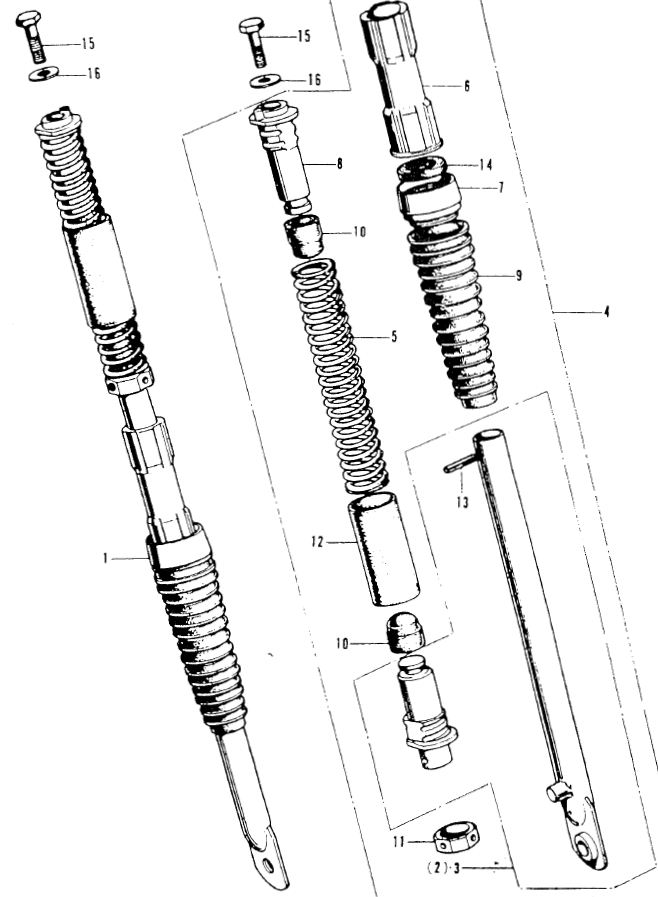
A few new parts and a few old parts, but I think I have everything laid out.

I'm using delrin fork guide from Tboltusa.com instead of stock whites. Here's my basic mock-up. These pogo sticks are so weird compared to a regular hydraulic front end. pipe(-2 or -3), boot(-9), cap(weird nut -7), dust seal(-14), delrin guide(-6), piston(-11), roll pin(-13), holder(no #), rubber stopper(-10), spring(-5), cover(-12), rubber stopper(-10), upper holder(-8).

Interesting. I remember something kind of rotting off the holder when I took things apart. I assume this for noise reduction, but I am not sure.

I think plumbers tape will do. Maybe I should have used electrical tape. I don't know.

This is a good chore for big boy to help with.

Big boy did the stoppers, too.

Boot on the pipe.

Grease the pipe. Install dust seal into cap and grease the dust seal.

Slide on cap and seal.

Grease and slide on guide.

Install piston onto pipe. Align holes,

Grease the holder and get the spring ready to go.

Yeah this is still tricky. The holders thread into the springs like a bolt, but yeah this is tricky. You can get them too tight it seems as well. The main thing here I believe to get both sets looking the same.

This part is important and yes I knew and still screwed it up more than once. Go figure. The stay on the upper holder needs to be on the same side as the brake stay and/or drain hole. I used a nail in the middle to mock this up. It's very easy to put things together 180 degrees out.

It's almost impossible to put a roll pin in place when your hands are completely greased up. The pin needs to go through the piston, pipe, and lower holder. I actually had the best luck using a bench vice to hold a C-clamp to press the pin in.

I think those are ready now.

So here's my engine on the build stand. I need to mount the coil to the frame, then the frame with the triple tree to the engine, then everything else will bolt right on.

Sunday, November 17, 2013
CT70 All Balls Neck Bearings
Back to work on the Trail 70.
I need to start with the three or four or six handed job of swapping neck bearings. Columbus is always willing to help and I really appreciate him for that. After the neck bearings are in, I can work on the rest of it by myself and with the help of a seven year old.
Start with a set of All Ball Racing bearings. These are timken-style instead of loose balls like the stockers.

Two different bearings. The inner diameters are different and the outer races are different, too. The two dust seals(stacked in this picture) appear to be identical.

Here's the story on the different ID's. The big one is the bottom and smaller is the top. These are press fit and this picture is for planning and mock-up only.

The trees were powdercoated. My guy masked the top threads, but didn't mask the bearing journals. I don't like that extra thickness on there and I think the PC may gall up and make a mess. So I masked the neck with duct tape and went to scrapping.

That's most of it off of where I don't want it. Next time tell the PC guy to mask those.

A little emery cloth to clean up the rest.

Pack the bearings.


Put a seal on and lower the bottom bearing into place.

The stem is about 0.900 inch so a 1 inch ID pipe is perfect.

A couple of solid hits, but not all the way yet.

Align the dust seal before you fully seat the bearing.

Perfect.

Now drive the old races(top and bottom) out of the frame neck with a brass punch and big hammer.

Some cleaning out of PC is needed here, too.

This is the six handed part. Columbus has the bearing race, driver, and hammer. I held the frame with the neck square on the bench. Columbus' wife took the pictures for the blog. Verify that you have the top race or the bottom accordingly.


Drive the top race until it bottoms out.

Flip the frame and do the other one.

Pull the masking off the stem threads.

Put the stem through the frame and place the top bearing in place.

"Press" the top bearing into place with the steering stem nut and a hook spanner wrench.

Once the bearing is seated, take the nut off and put the other dust seal in place.

Put everything back together and check it out. It may need re-adjusting after a few miles, but at least I can start building the rest of the bike.
Wednesday, November 6, 2013
Harley Davidson Maingear Seal Driver 4 or 5 Speed
So if you need one of these you can build one if you're bored enough to not drop $75 for Jim's tool #2256.

Yeah. I'm not a draftsman and don't have own a CAD program, but Microsoft Powerpoint is better than a napkin.

Yeah. I'm not a draftsman and don't have own a CAD program, but Microsoft Powerpoint is better than a napkin.
Subscribe to:
Posts (Atom)